URP
基于URP14+的Shader学习笔记,包括URP的基础概念、ShaderLab属性、HLSL函数库、效果实现等

优质学习资源
综合类学习网站:
网站 描述 LearnOpenGL CN LearnOpenGL中文教程,包含了一些图形学知识和具体效果的实现 Wrting URP Shader 提供了关于URP Shader的常用方法索引 楠溪泽岸-CSDN博客 这位博主有大量可供参考的URP案例 TA-Learning 该github仓库包含了一位学长案例集
Unity Shader拾遗
Unity Shader基础概念及工作流
pragma/include_with_pragmas/keywords
Shader variants and shader keywords
Declaring and using shader keywords in HLSL
include and include_with_pragmas directives in HLSL
ShaderLab Properties的属性
ShaderLab模板:
1
2
3
4
      Properties
      {
          [Attributes] PropertyName ("Label", Type) = DefaultValue
      }
Unity Shader ToggleDrawer 布尔开关变量 [Toggle] 设置属性
Using shader keywords with the material Inspector
MaterialPropertyDrawer - Unity 脚本 API
| 属性 | 功能 |
|---|---|
| [Gamma] | 指示浮点数或矢量属性使用 sRGB 值,这意味着如果项目中的颜色空间需要,则它必须与其他 sRGB 值一起转换。有关更多信息,请参阅着色器程序中的属性。 |
| [HDR] | 指示纹理或颜色属性使用高动态范围 (HDR) 值。 对于纹理属性,如果分配了 LDR 纹理,则 Unity 编辑器会显示警告。对于颜色属性,Unity 编辑器会使用 HDR 拾色器编辑此值。 |
| [HideInInspector] | 告知 Unity 编辑器在 Inspector 中隐藏此属性。 |
| [MainTexture] | 为材质设置主纹理,可以使用 Material.mainTexture 进行访问。 默认情况下,Unity 将具有属性名称 _MainTex 的纹理视为主纹理。如果纹理具有不同的属性名称,但希望 Unity 将它视为主纹理,请使用此特性。 如果多次使用此特性,则 Unity 会使用第一个属性并忽略后续属性。 注意:使用此特性设置主纹理时,如果使用纹理串流调试视图模式或自定义调试工具,则该纹理在游戏视图中不可见。 |
| [MainColor] | 为材质设置主色,可以使用 Material.color 进行访问。 默认情况下,Unity 将具有属性名称 _Color 的颜色视为主色。如果您的颜色具有其他属性 (property) 名称,但您希望 Unity 将这个颜色视为主色,请使用此属性 (attribute)。如果您多次使用此属性 (attribute),则 Unity 会使用第一个属性 (property),而忽略后续属性 (property)。 |
| [NoScaleOffset] | 告知 Unity 编辑器隐藏此纹理属性的平铺和偏移字段。 |
| [Normal] | 指示纹理属性需要法线贴图。 如果分配了不兼容的纹理,则 Unity 编辑器会显示警告。 |
| [PerRendererData] | 指示纹理属性将来自每渲染器数据,形式为 MaterialPropertyBlock。 材质 Inspector 会将这些属性显示为只读。 |
| [Header(XXX)] | 在Inspector中显示一个标题为XXX的折叠栏 |
| [ToggleUI] | 在Inspector中显示一个开关按钮 |
| [Space] | 在Inspector中显示一个空白行 |
| [IntRange] | 在Inspector中显示一个整数范围滑动条 |
| [NoScaleOffset] | 在Inspector中隐藏纹理的平铺和偏移字段 |
| [PerRendererData] | 表示纹理属性来自每个渲染器数据,以MaterialPropertyBlock的形式 |
| [Enum] | 在Inspector中显示一个枚举选择框 |
| [PowerSlider] | 显示一个slider |
LOD
ShaderLab:为子着色器指定 LOD 值 - Unity 手册
Tags/Property/etc
HLSL
参考链接
official links:
通用渲染管线概述(注意,此为URP 12.1.1)
语法参考:
other links:
在URP里写Shader(一):介绍-从Built-In到URP - 知乎
从build-in到URP (HLSL与CG的区别)
可以阅读URP内置的shader,位于
Packages/com.unity.render-pipelines.universal/Shaders中
shaderlab中代码块
 原来为 CGPROGRAM
 现在为 HLSLPROGRAM;

 原来为 ENDCG
 现在为 ENDHLSL;
头文件引用
1
2
3
4
5
6
7
 // CG中的引用
 #include "UnityCG.cginc"
 #include "AutoLight.cginc"

 // HLSL中的引用
 #include "Packages/com.unity.render-pipelines.universal/ShaderLibrary/Lighting.hlsl"
 #include "Packages/com.unity.render-pipelines.universal/ShaderLibrary/Core.hlsl"
注意:URP中的头文件引用路径为
Packages/com.unity.render-pipelines.universal/ShaderLibrary/,而Packages/com.unity.render-pipelines.core/ShaderLibrary/中的头文件在引用Core.hlsl后会一同被引入。Properties中的变量声明
1
2
3
4
5
6
7
8
9
10
11
12
13
14
 // CG中的声明
 sampler2D _MainTex;
 float4 _MainTex_ST;
 float4 _Color;

 // HLSL中的声明
 TEXTURE2D(_MainTex);
 SAMPLER(sampler_MainTex);

 CBUFFER_START(UnityPerMaterial) // UnityPerMaterial是URP中的一个常量缓冲区
     float4 _BaseMap_ST;         // 除了纹理外,其它变量需要在CBUFFER_START和CBUFFER_END之间声明
     float4 _Color;
 CBUFFER_END
HLSL中
fixed一般不用(其支持的平台少),用half代替在subshader中需要声明
{Tags{"RenderPipeline"="UniversalPipeline"}}
HLSL函数库
补充:关于HLSLINCLUDE
作用:在Shader中使用HLSLINCLUDE和ENDHLSL之间的代码块,可以在多个Pass中共享代码。Unity 将此代码包含在 HLSLPROGRAM 块中定义的所有着色器程序中,可位于此源文件的任何位置。
用法:
1
2
3
  HLSLINCLUDE
      // 在此编写要共享的 HLSL 代码
  ENDHLSL
模板:
1
2
3
4
5
6
7
8
9
10
11
12
13
14
15
16
17
18
19
20
21
22
23
24
25
26
27
28
  Shader "Examples/ExampleShader"
  {
      SubShader
      {

          HLSLINCLUDE
              // 在此编写要共享的 HLSL 代码
          ENDHLSL

          Pass
          {
              Name "ExampleFirstPassName"
              Tags { "LightMode" = "ExampleLightModeTagValue" }

              // 在此编写设置渲染状态的 ShaderLab 命令

              HLSLPROGRAM
                  // 此 HLSL 着色器程序自动包含上面的 HLSLINCLUDE 块的内容
                  // 在此编写 HLSL 着色器代码
              ENDHLSL
          }

          Pass
          {
              // other pass
          }
      }
  }
com.unity.render-pipelines.universal
Core.hlsl
1
2
3
4
5
6
7
8
9
10
11
GetVertexPositionInputs(float3 positionOS)	//获取输入顶点坐标信息,返回VertexPositionInputs结构体(包含CS,WS,VS,NDC坐标)
GetVertexNormalInputs(float3 normalOS)	//获取输入顶点法线信息
GetVertexNormalInputs(float3 normalOS, float4 tangentOS)	//获取输入顶点法线信息(重载)
GetScaledScreenParams()	//获取屏幕缩放参数信息
NormalizeNormalPerVertex(real3 normalWS)	//逐顶点法线正交
NormalizeNormalPerPixel(real3 normalWS)	//逐像素法线正交
ComputeScreenPos(float4 positionCS)	//计算屏幕坐标信息
(real)ComputeFogFactor(float z)	//计算雾参数
(real)ComputeFogIntensity(real fogFactor)	//计算雾强度
(half3)MixFogColor(real3 fragColor, real3 fogColor, real fogFactor)	//混合雾颜色
(half3)MixFog(real3 fragColor, real fogFactor)	//混合雾
Lighting.hlsl
1
2
3
4
5
6
7
8
9
10
11
12
13
14
15
16
17
18
19
20
21
22
23
24
Light GetMainLight() //获取主要的光源
Light GetAdditionalLight(uint lightIndex, float3 positionInWorldSpace) //获取指定索引的附加光源
int GetAdditionalLightsCount() //获取附加光源的数量

DistanceAttenuation(float distanceSqr, half2 distanceAttenuation)	//计算距离衰减
AngleAttenuation(half3 spotDirection, half3 lightDirection, half2 spotAttenuation)	//计算角度衰减
GetMainLight()/GetMainLight(float4 shadowCoord)	//获取主要的光源
GetPerObjectLightIndex(int index)	//获取每个对象的光源索引
GetAdditionalLightsCount()	//获取附加光源的数量
ReflectivitySpecular(half3 specular)	//计算高光反射率
OneMinusReflectivityMetallic(half metallic)	//计算金属的反射率
InitializeBRDFData(half3 albedo, half metallic, half3 specular, half smoothness, half alpha, out BRDFData outBRDFData)	//初始化BRDF数据
EnvironmentBRDF(BRDFData brdfData, half3 indirectDiffuse, half3 indirectSpecular, half fresnelTerm)	//计算环境BRDF
DirectBDRF(BRDFData brdfData, half3 normalWS, half3 lightDirectionWS, half3 viewDirectionWS)	//计算直接BRDF
SampleLightmap(float2 lightmapUV, half3 normalWS)	//采样光照贴图
GlossyEnvironmentReflection(half3 reflectVector, half perceptualRoughness, half occlusion)	//计算环境光泽反射
GlobalIllumination(BRDFData brdfData, half3 bakedGI, half occlusion, half3 normalWS, half3 viewDirectionWS)	//计算全局光照
MixRealtimeAndBakedGI(inout Light light, half3 normalWS, inout half3 bakedGI, half4 shadowMask)	//混合实时和烘焙的全局光照
LightingLambert(half3 lightColor, half3 lightDir, half3 normal)	//应用兰伯特光照模型
LightingSpecular(half3 lightColor, half3 lightDir, half3 normal, half3 viewDir, half4 specular, half smoothness)	//应用高光光照模型
LightingPhysicallyBased(BRDFData brdfData, half3 lightColor, half3 lightDirectionWS, half lightAttenuation, half3 normalWS, half3 viewDirectionWS)/LightingPhysicallyBased(BRDFData brdfData, Light light, half3 normalWS, half3 viewDirectionWS)	//应用基于物理的光照模型
VertexLighting(float3 positionWS, half3 normalWS)	//计算顶点光照颜色
LightweightFragmentPBR(InputData inputData, half3 albedo, half metallic, half3 specular,half smoothness, half occlusion, half3 emission, half alpha)	//应用轻量级片元PBR
LightweightFragmentBlinnPhong(InputData inputData, half3 diffuse, half4 specularGloss, half smoothness, half3 emission, half alpha)	//应用轻量级片元布林·冯模型
Shadow.hlsl
1
2
3
4
5
6
7
8
9
10
GetShadowCoord(VertexPositionInputs vertexInput)	//获取阴影坐标信息
TransformWorldToShadowCoord(float3 positionWS)	//将世界坐标转换为阴影坐标

GetMainLightShadowStrength()	//获取主光源的阴影强度
GetAdditionalLightShadowStrenth(int lightIndex)	//获取指定索引的附加光源的阴影强度
SampleScreenSpaceShadowmap(float4 shadowCoord)	//采样屏幕空间的阴影贴图
SampleShadowmap(float4 shadowCoord, TEXTURE2D_SHADOW_PARAM(ShadowMap, sampler_ShadowMap), ShadowSamplingData samplingData, half shadowStrength, bool isPerspectiveProjection = true)	//采样阴影贴图
MainLightRealtimeShadow(float4 shadowCoord)	//获取主光源的实时阴影
AdditionalLightRealtimeShadow(int lightIndex, float3 positionWS)	//获取指定索引的附加光源的实时阴影
ApplyShadowBias(float3 positionWS, float3 normalWS, float3 lightDirection)	//应用阴影偏移
UnityInput.hlsl
Unity输入变量库
1
2
3
4
5
6
7
8
9
10
11
// 主要用于获取Unity内置的各种输入变量,如时间、屏幕坐标、投影矩阵等
_ZBufferParams	//深度缓冲区参数
_ScreenParams	//屏幕参数
_ProjectionParams	//投影参数
_WorldSpaceCameraPos	//世界空间相机位置

float4 _Time; // (t/20, t, t*2, t*3)
float4 _SinTime; // sin(t/8), sin(t/4), sin(t/2), sin(t)
float4 _CosTime; // cos(t/8), cos(t/4), cos(t/2), cos(t)
float4 unity_DeltaTime; // dt, 1/dt, smoothdt, 1/smoothdt
float4 _TimeParameters; // t, sin(t), cos(t)
GlobalIllumination.hlsl
1
2
3
SampleSH(float3 normalWS)	// 采样球谐光照
待补充
Input.hlsl
1
2
3
4
5
6
7
8
9
10
11
12
13
14
15
16
17
18
19
20
21
22
23
24
25
26
27
28
29
30
31
32
33
34
35
36
37
38
39
40
41
42
43
#define _InvCameraViewProj unity_MatrixInvVP
float4 _ScaledScreenParams;

// x = Mip Bias
// y = 2.0 ^ [Mip Bias]
float2 _GlobalMipBias;

// 1.0 if it's possible for AlphaToMask to be enabled for this draw and 0.0 otherwise
float _AlphaToMaskAvailable;

float4 _MainLightPosition;
// In Forward+, .a stores whether the main light is using subtractive mixed mode.
half4 _MainLightColor;
half4 _MainLightOcclusionProbes;
uint _MainLightLayerMask;

// xyz are currently unused
// w: directLightStrength
half4 _AmbientOcclusionParam;

half4 _AdditionalLightsCount;

uint _RenderingLayerMaxInt;
float _RenderingLayerRcpMaxInt;

// Screen coord override.
float4 _ScreenCoordScaleBias;
float4 _ScreenSizeOverride;

#define UNITY_MATRIX_M     unity_ObjectToWorld
#define UNITY_MATRIX_I_M   unity_WorldToObject
#define UNITY_MATRIX_V     unity_MatrixV
#define UNITY_MATRIX_I_V   unity_MatrixInvV
#define UNITY_MATRIX_P     OptimizeProjectionMatrix(glstate_matrix_projection)
#define UNITY_MATRIX_I_P   unity_MatrixInvP
#define UNITY_MATRIX_VP    unity_MatrixVP
#define UNITY_MATRIX_I_VP  unity_MatrixInvVP
#define UNITY_MATRIX_MV    mul(UNITY_MATRIX_V, UNITY_MATRIX_M)
#define UNITY_MATRIX_T_MV  transpose(UNITY_MATRIX_MV)
#define UNITY_MATRIX_IT_MV transpose(mul(UNITY_MATRIX_I_M, UNITY_MATRIX_I_V))
#define UNITY_MATRIX_MVP   mul(UNITY_MATRIX_VP, UNITY_MATRIX_M)
#define UNITY_PREV_MATRIX_M   unity_MatrixPreviousM
#define UNITY_PREV_MATRIX_I_M unity_MatrixPreviousMI
ShaderVariablesFunctions.hlsl
1
2
3
4
5
6
7
8
9
10
11
12
13
14
15
GetVertexPositionInputs(float3 positionOS) //获取输入顶点坐标的裁剪空间、世界空间、视图空间和归一化设备坐标
GetVertexNormalInputs(float3 normalOS)	//获取输入顶点的法线信息

GetCameraPositionWS()	//获取世界空间中的相机位置
GetScaledScreenParams() //返回经过缩放的屏幕参数,包括宽度和高度
GetViewForwardDir() //获取视角的前向方向
IsPerspectiveProjection() //如果相机是透视投影,则返回true
// Linear depth buffer value between [0, 1] or [1, 0] to eye depth value between [near, far]
half LinearDepthToEyeDepth(half rawDepth) //线性深度转换为视角深度
void TransformScreenUV(inout float2 uv, float screenHeight) //屏幕UV转换
GetNormalizedScreenSpaceUV(float2 positionInClipSpace) //获取标准化屏幕空间UV

GetObjectSpaceNormalizeViewDir(float3 positionInObjectSpace) //获取物体空间标准化视角方向
GetWorldSpaceNormalizeViewDir(float3 positionInWorldSpace) //获取世界空间标准化视角方向
float3 GetWorldSpaceViewDir(float3 positionInWorldSpace) //获取世界空间视角方向
Common.hlsl
十分重要的函数库,包含了很多常用的函数,包含:Common math functions/ Texture utilities/ Texture format sampling/ Depth encoding&decoding/ Space transformations/ PositionInputs/ Terrain&Brush heightmap encoding&decoding/ Misc utilities
1
2
3
4
5
6
7
8
9
10
11
12
13
14
15
16
17
18
19
20
21
22
23
24
25
26
27
28
29
30
// Z buffer to linear 0..1 depth (0 at near plane, 1 at far plane).
// zBufferParam = { (f-n)/n, 1, (f-n)/n*f, 1/f }
float Linear01DepthFromNear(float depth, float4 zBufferParam)
{
    return 1.0 / (zBufferParam.x + zBufferParam.y / depth);
}

// Z buffer to linear 0..1 depth (0 at camera position, 1 at far plane).
// zBufferParam = { (f-n)/n, 1, (f-n)/n*f, 1/f }
float Linear01Depth(float depth, float4 zBufferParam)
{
    return 1.0 / (zBufferParam.x * depth + zBufferParam.y);
}

// Z buffer to linear depth.
// zBufferParam = { (f-n)/n, 1, (f-n)/n*f, 1/f }
float LinearEyeDepth(float depth, float4 zBufferParam)
{
    return 1.0 / (zBufferParam.z * depth + zBufferParam.w);
}
float LinearEyeDepth(float2 positionNDC, float deviceDepth, float4 invProjParam);

// 通过vertexID获取全屏三角形的顶点位置, vertexID通过语义SV_VertexID获取
float4 GetFullScreenTriangleVertexPosition(uint vertexID, float z = UNITY_NEAR_CLIP_VALUE);
// 通过vertexID获取全屏三角形的纹理坐标, vertexID通过语义SV_VertexID获取
float2 GetFullScreenTriangleTexCoord(uint vertexID);

float3 ComputeWorldSpacePosition(float2 positionNDC, float deviceDepth, float4x4 invViewProjMatrix) //NDC反算世界空间坐标
float4 ComputeClipSpacePosition() //反算裁剪空间坐标
DeclareDepthTexture.hlsl
1
2
3
4
5
6
7
8
9
10
// 只提供了两个函数,方便快速获取屏幕深度
float SampleSceneDepth(float2 uv)
{
    return SAMPLE_TEXTURE2D_X(_CameraDepthTexture, sampler_CameraDepthTexture, UnityStereoTransformScreenSpaceTex(uv)).r;
}

float LoadSceneDepth(uint2 uv)
{
    return LOAD_TEXTURE2D_X(_CameraDepthTexture, uv).r;
}
- 关于Load和Sample的区别:Load是直接从纹理中读取数据,而Sample是从纹理中采样数据,Sample会对纹理进行插值,所以Sample的结果更加平滑。Load Texture2D
com.unity.render-pipelines.core
SpaceTransforms.hlsl
1
2
3
4
5
6
7
8
9
10
11
12
13
14
15
TransformObjectToWorld(float3 positionOS)	//将当前模型空间转换为世界空间矩阵,通常用于将顶点/方向向量从模型空间转换为世界空间
TransformWorldToObject(float3 positionWS)	//将当前世界空间转换为模型空间矩阵,通常用于将顶点/方向向量从世界空间转换为模型空间
TransformWorldToView(float3 positionWS)	//将当前世界空间转换为相机空间矩阵,通常用于将顶点/方向向量从世界空间转换为相机空间
TransformObjectToHClip(float3 positionOS)	//将当前模型空间转换为裁剪空间矩阵,通常用于将顶点/方向向量从模型空间转换为裁剪空间
TransformWorldToHClip(float3 positionWS)	//将当前世界空间转换为裁剪空间矩阵,通常用于将顶点/方向向量从世界空间转换为裁剪空间
TransformWViewToHClip(float3 positionVS)	//将当前相机空间转换为裁剪空间矩阵,通常用于将顶点/方向向量从相机空间转换为裁剪空间
TransformObjectToWorldDir(real3 dirOS)	//将方向向量从模型空间转换为世界空间
TransformWorldToObjectDir(real3 dirWS)	//将方向向量从世界空间转换为模型空间
TransformWorldToViewDir(real3 dirWS)	//将方向向量从世界空间转换为相机空间
TransformWorldToHClipDir(real3 directionWS)	//将方向向量从世界空间转换为裁剪空间
TransformObjectToWorldNormal(float3 normalOS)	//将法线从模型空间转换为世界空间
CreateTangentToWorld(real3 normal, real3 tangent, real flipSign)	//创建一个从切线空间转换为世界空间的3x3矩阵
TransformTangentToWorld(real3 dirTS, real3x3 tangentToWorld)	//将当前切线空间转换为世界空间矩阵,通常用于将顶点/方向向量从切线空间转换为世界空间
TransformWorldToTangent(real3 dirWS, real3x3 tangentToWorld)	//将当前世界空间转换为切线空间矩阵,通常用于将顶点/方向向量从世界空间转换为切线空间
TransformTangentToObject(real3 dirTS, real3x3 tangentToWorld)	//将当前切线空间转换为模型空间矩阵,通常用于将顶点/方向向量从切线空间转换为模型空间
CGIncludes
HLSLSupport.cginc
1
2
3
// 定义了许多基础性的常量与函数
UNITY_NEAR_CLIP_VALUE //近裁剪面
UNITY_REVERSED_Z //是否反向Z, 1表示反向Z,不同平台可能不同
基础效果
补充:URP内置Texture变量
- _CameraDepthTexture: 相机深度纹理
- _CameraOpaqueTexture: 相机不透明纹理
- _CameraNormalsTexture: 相机法线纹理
- _CameraDepthNormalsTexture: 相机深度法线纹理
- sampler2D_half _CameraMotionVectorsTexture: 相机运动矢量纹理
Ambient 全局环境光
1
2
3
4
5
6
7
8
9
// method 1: 该常量定义在input.hlsl中
half3 ambient = _GlossyEnvironmentColor.rgb;

// method 2: 常量定义于UnityShaderVariables.cginc中,不推荐
half3 ambient = half3(unity_SHAr, unity_SHAg.x, unity_SHAb.x);

// method 3: 通过球谐光照计算环境光, 该函数定义在GlobalIllumination.hlsl中, 该方法更为推荐
half3 ambient = SampleSH(normalWS);
基础光照
通过
GetMainLight()获取主光源信息,位于RealTimeLights.hlsl中,返回值为Light结构体:1 2 3 4 5 6 7 8 9 10 11 12 13 14 15 16 17 18 19 20 21 22 23 24 25 26 27 28 29
struct Light { half3 direction; half3 color; float distanceAttenuation; // full-float precision required on some platforms half shadowAttenuation; uint layerMask; }; Light GetMainLight() { Light light; light.direction = half3(_MainLightPosition.xyz); #if USE_FORWARD_PLUS #if defined(LIGHTMAP_ON) && defined(LIGHTMAP_SHADOW_MIXING) light.distanceAttenuation = _MainLightColor.a; #else light.distanceAttenuation = 1.0; #endif #else light.distanceAttenuation = unity_LightData.z; // unity_LightData.z is 1 when not culled by the culling mask, otherwise 0. #endif light.shadowAttenuation = 1.0; light.color = _MainLightColor.rgb; light.layerMask = _MainLightLayerMask; return light; }
通过
GetCameraPositionWS()获取相机位置(WS表示World Space),返回值为float3
法线贴图
与build-in中逻辑相同参考:[[Build-in]]
函数:
1
2
3
4
  TRANSFORM_TEX(_MainTex, _MainTex_ST) // 纹理坐标应用平移和缩放
  SAMPLE_TEXTURE2D(_MainTex, sampler_MainTex, IN.uv_MainTex); // 采样纹理
  real3 UnpackNormal(real4 packedNormal); // 解压法线贴图(值域范围从[0,1]->[-1,1]),注意贴图需标记为NormalMap
  UnpackNormalScale(real4 packedNormal, real scale); // 解压法线贴图并缩放
注意:在vertex shader中采样可能会出现报错:cannot map expression to vs_4_0 instruction set Compiling Subshader: 0, Pass: <Unnamed Pass 0>, Vertex program with <no keywords> Platform defines: SHADER_API_DESKTOP UNITY_ENABLE_DETAIL_NORMALMAP UNITY_ENABLE_REFLECTION_BUFFERS UNITY_LIGHTMAP_FULL_H,可以将采样换为: tex2Dlod(sampler2D _MainTex, float4(IN.uv_MainTex, 0, 0))来解决。
多光源
ref: URP多光源处理
URP不同于build-in中使用ForwardBasePass和ForwardAddPass分别处理主光源和额外光源,URP管线会将所有光源信息传递给Shader,然后可以自行处理(常使用for循环遍历所有光源)
实现
1
2
3
4
5
6
7
8
9
10
11
12
13
14
15
16
17
18
19
20
21
22
23
24
25
26
27
28
29
30
31
32
33
34
35
36
37
38
39
40
41
42
43
44
45
46
47
48
49
50
51
52
53
54
55
56
57
58
59
60
61
62
63
64
65
66
67
68
69
70
71
72
73
74
75
76
77
78
79
80
81
82
83
84
85
86
87
88
89
90
91
92
93
94
95
96
97
98
99
100
101
102
103
104
105
106
107
108
109
110
111
112
113
114
115
116
117
118
119
120
121
  Shader "URP/MultiLight"
  {
      Properties
      {
          _Diffuse ("Diffuse", Color) = (1, 1, 1, 1)
          _Specular ("Specular", Color) = (1, 1, 1, 1)
          _Gloss ("Gloss", Range(8.0, 256)) = 20
          [Toggle(_AdditionalLights)] _AddLights ("AddLights", Float) = 1 // [Toggle(_AdditionalLights)]是一个属性标签,它将_AddLights属性在Unity材质编辑器中显示为一个复选框。这意味着,你可以在Unity的材质编辑器中通过勾选或取消勾选这个复选框来开启或关闭额外的灯光。
          // _AdditionalLights是一个参数,它定义了在材质编辑器中显示的复选框的名称。这个参数是可选的,如果你不提供这个参数,那么复选框的名称将默认为属性的名称(在这个例子中是_AddLights)。
          // https://docs.unity.cn/cn/2023.2/Manual/SL-Properties.html#material-property-declaration-syntax-by-type
      }
      SubShader
      {
          Tags { "RenderType" = "Opaque" "RenderPipeline" = "UniversalPipeline" }

          HLSLINCLUDE
          #include "Packages/com.unity.render-pipelines.universal/ShaderLibrary/Core.hlsl"

          CBUFFER_START(UnityPerMaterial)
          float4 _Diffuse;
          float4 _Specular;
          float _Gloss;
          CBUFFER_END
          ENDHLSL

          Pass
          {
              Tags { "LightMode" = "UniversalForward" }

              HLSLPROGRAM

              #pragma shader_feature _AdditionalLights // 使用shader_feature指令来控制是否编译额外的光源

              #pragma vertex vert
              #pragma fragment frag

              #include "Packages/com.unity.render-pipelines.universal/ShaderLibrary/Lighting.hlsl"


              struct Attributes
              {
                  float4 positionOS: POSITION;
                  float3 normalOS: NORMAL;
                  float4 tangentOS: TANGENT;
              };

              struct Varyings
              {
                  float4 positionCS: SV_POSITION;
                  float3 positionWS: TEXCOORD0;
                  float3 normalWS: TEXCOORD1;
                  float3 viewDirWS: TEXCOORD2;
              };


              Varyings vert(Attributes v)
              {
                  Varyings o;
                  // 获取不同空间下坐标信息
                  VertexPositionInputs positionInputs = GetVertexPositionInputs(v.positionOS.xyz);
                  o.positionCS = positionInputs.positionCS;
                  o.positionWS = positionInputs.positionWS;

                  // 获取世界空间下法线相关向量
                  VertexNormalInputs normalInput = GetVertexNormalInputs(v.normalOS, v.tangentOS);

                  o.normalWS = NormalizeNormalPerVertex(normalInput.normalWS);
                  o.viewDirWS = GetCameraPositionWS() - positionInputs.positionWS;

                  return o;
              }

              half3 LightingBased(half3 lightColor, half3 lightDirectionWS, half lightAttenuation, half3 normalWS, half3 viewDirectionWS)
              {
                  // 兰伯特漫反射计算
                  half NdotL = saturate(dot(normalWS, lightDirectionWS));
                  half3 radiance = lightColor * (lightAttenuation * NdotL) * _Diffuse.rgb;
                  // BlinnPhong高光反射
                  half3 halfDir = normalize(lightDirectionWS + viewDirectionWS);
                  half3 specular = lightColor * pow(saturate(dot(normalWS, halfDir)), _Gloss) * _Specular.rgb;

                  return radiance + specular;
              }

              half3 LightingBased(Light light, half3 normalWS, half3 viewDirectionWS)
              {
                  // 注意light.distanceAttenuation * light.shadowAttenuation,这里已经将距离衰减与阴影衰减进行了计算
                  return LightingBased(light.color, light.direction, light.distanceAttenuation * light.shadowAttenuation, normalWS, viewDirectionWS);
              }

              half4 frag(Varyings i): SV_Target
              {
                  half3 normalWS = NormalizeNormalPerPixel(i.normalWS);
                  half3 viewDirWS = SafeNormalize(i.viewDirWS);

                  // 使用HLSL的函数获取主光源数据
                  Light mainLight = GetMainLight();
                  half3 diffuse = LightingBased(mainLight, normalWS, viewDirWS);

                  // 计算其他光源
                  #ifdef _AdditionalLights
                      uint pixelLightCount = GetAdditionalLightsCount();
                      for (uint lightIndex = 0u; lightIndex < pixelLightCount; ++ lightIndex)
                      {
                          // 获取其他光源
                          Light light = GetAdditionalLight(lightIndex, i.positionWS);
                          diffuse += LightingBased(light, normalWS, viewDirWS);
                      }
                  #endif

                  // 采用球谐光照计算环境光
                  half3 ambient = SampleSH(normalWS);
                  return half4(ambient + diffuse, 1.0);
              }

              ENDHLSL

          }
      }
      FallBack "Packages/com.unity.render-pipelines.universal/FallbackError"
  }
说明:
1
2
3
4
5
  half3 SampleSH(normalWS) // 采用球谐光照计算环境光,位于GlobalIllumination.hlsl中

  uint GetAdditionalLightsCount() // 获取额外光源数量,位于Lighting.hlsl中
  Light GetAdditionalLight(int lightIndex, float3 positionWS) // 获取额外光源信息,位于Lighting.hlsl中
半透明材质
阴影/多光源阴影
ref:
Use shadows in a custom URP shader
[URP 物体阴影](https://www.bilibili.com/read/cv14892527/) 思路:阴影实现分为接收阴影和投射阴影两部分,在build-in中,接收阴影通过
ShadowCasterPass实现(常用内置的ShadowCasterPass)。官方实现步骤:
Make sure there are objects in your scene that have a
ShadowCastershader pass, for example objects that use theUniversal Render Pipeline/Lit shader`.Add
#pragma multi_compile _ _MAIN_LIGHT_SHADOWS _MAIN_LIGHT_SHADOWS_CASCADE _MAIN_LIGHT_SHADOWS_SCREENto your shader, so it can access the shadow map for the main light.Add
#pragma multi_compile _ _ADDITIONAL_LIGHT_SHADOWSto your shader, so it can access the shadow maps for additional lights.
实现参考
1
2
3
4
5
6
7
8
9
10
11
12
13
14
15
16
17
18
19
20
21
22
23
24
25
26
27
28
29
30
31
32
33
34
35
36
37
38
39
40
41
42
43
44
45
46
47
48
49
50
51
52
53
54
55
56
57
58
59
60
61
62
63
64
65
66
67
68
69
70
71
72
73
74
75
76
77
78
79
80
81
82
83
84
85
86
87
88
89
90
91
92
93
94
95
96
97
98
99
100
101
102
103
104
105
106
107
108
109
110
111
112
113
114
115
116
117
118
119
120
121
122
123
124
125
126
127
128
129
130
131
132
133
134
135
136
137
138
139
140
141
142
143
144
145
146
147
148
149
150
151
152
153
154
155
156
157
158
159
160
161
162
163
164
165
166
167
168
169
170
171
172
173
174
175
176
177
178
179
180
181
182
183
184
185
186
187
188
189
190
191
192
193
194
195
196
197
198
199
200
  {
      Properties
      {
          _Diffuse ("Diffuse", Color) = (1, 1, 1, 1)
          _Specular ("Specular", Color) = (1, 1, 1, 1)
          _Gloss ("Gloss", Range(8.0, 256)) = 20
          [Toggle(_AdditionalLights)] _AddLights ("AddLights", Float) = 1
      }
      SubShader
      {
          Tags { "RenderType" = "Opaque" "RenderPipeline" = "UniversalPipeline" }

          HLSLINCLUDE
          #include "Packages/com.unity.render-pipelines.universal/ShaderLibrary/Core.hlsl"

          CBUFFER_START(UnityPerMaterial)
          float4 _Diffuse;
          float4 _Specular;
          float _Gloss;
          CBUFFER_END
          ENDHLSL

          Pass
          {
              Tags { "LightMode" = "UniversalForward" }

              HLSLPROGRAM

              // 设置关键字
              #pragma shader_feature _AdditionalLights

              // 接收阴影所需关键字
              #pragma multi_compile _ _MAIN_LIGHT_SHADOWS //接受阴影, #pragma multi_compile是一个预处理器指令,它用于在编译时创建多个Shader变体。这个指令告诉Unity为每个列出的关键字生成一个Shader变体。在这个例子中,关键字是__MAIN_LIGHT_SHADOWS。
              // __MAIN_LIGHT_SHADOWS是一个预定义的关键字,它用于控制主光源的阴影。当这个关键字被定义时,Shader将包含处理主光源阴影的代码。否则,这部分代码将被省略,这可以提高性能。
              #pragma multi_compile _ _MAIN_LIGHT_SHADOWS_CASCADE
              #pragma multi_compile _ _ADDITIONAL_LIGHTS_VERTEX _ADDITIONAL_LIGHTS
              #pragma multi_compile _ _SHADOWS_SOFT

              #pragma vertex vert
              #pragma fragment frag

              #include "Packages/com.unity.render-pipelines.universal/ShaderLibrary/Lighting.hlsl"


              struct Attributes
              {
                  float4 positionOS: POSITION;
                  float3 normalOS: NORMAL;
                  float4 tangentOS: TANGENT;
              };

              struct Varyings
              {
                  float4 positionCS: SV_POSITION;
                  float3 positionWS: TEXCOORD0;
                  float3 normalWS: TEXCOORD1;
                  float3 viewDirWS: TEXCOORD2;
              };


              Varyings vert(Attributes v)
              {
                  Varyings o;
                  // 获取不同空间下坐标信息
                  VertexPositionInputs positionInputs = GetVertexPositionInputs(v.positionOS.xyz);
                  o.positionCS = positionInputs.positionCS;
                  o.positionWS = positionInputs.positionWS;

                  // 获取世界空间下法线相关向量
                  VertexNormalInputs normalInput = GetVertexNormalInputs(v.normalOS, v.tangentOS);

                  o.normalWS = NormalizeNormalPerVertex(normalInput.normalWS);
                  o.viewDirWS = GetCameraPositionWS() - positionInputs.positionWS;

                  return o;
              }

              half3 LightingBased(half3 lightColor, half3 lightDirectionWS, half lightAttenuation, half3 normalWS, half3 viewDirectionWS)
              {
                  // 兰伯特漫反射计算
                  half NdotL = saturate(dot(normalWS, lightDirectionWS));
                  half3 radiance = lightColor * (lightAttenuation * NdotL) * _Diffuse.rgb;
                  // BlinnPhong高光反射
                  half3 halfDir = normalize(lightDirectionWS + viewDirectionWS);
                  half3 specular = lightColor * pow(saturate(dot(normalWS, halfDir)), _Gloss) * _Specular.rgb;

                  return radiance + specular;
              }

              half3 LightingBased(Light light, half3 normalWS, half3 viewDirectionWS)
              {
                  // 注意light.distanceAttenuation * light.shadowAttenuation,这里已经将距离衰减与阴影衰减进行了计算
                  return LightingBased(light.color, light.direction, light.distanceAttenuation * light.shadowAttenuation, normalWS, viewDirectionWS);
              }

              half4 frag(Varyings i): SV_Target
              {
                  half3 normalWS = NormalizeNormalPerPixel(i.viewDirWS);
                  half3 viewDirWS = SafeNormalize(i.normalWS);

                  // 获取阴影坐标
                  float4 shadowCoord = TransformWorldToShadowCoord(i.positionWS.xyz);

                  // 使用HLSL的函数获取主光源数据
                  Light mainLight = GetMainLight(shadowCoord);
                  half3 diffuse = LightingBased(mainLight, normalWS, viewDirWS);

                  // 计算其他光源
                  #ifdef _AdditionalLights
                      uint pixelLightCount = GetAdditionalLightsCount();
                      for (uint lightIndex = 0u; lightIndex < pixelLightCount; ++ lightIndex)
                      {
                          // 获取其他光源
                          Light light = GetAdditionalLight(lightIndex, i.positionWS);
                          diffuse += LightingBased(light, normalWS, viewDirWS);
                      }
                  #endif

                  half3 ambient = SampleSH(normalWS);
                  return half4(ambient + diffuse, 1.0);
              }

              ENDHLSL

          }

          //下面计算阴影的Pass可以直接通过使用URP内置的Pass计算
          //UsePass "Universal Render Pipeline/Lit/ShadowCaster"
          // or
          // 计算阴影的Pass
          Pass
          {
              Name "ShadowCaster"
              Tags { "LightMode" = "ShadowCaster" }
              Cull Off
              ZWrite On
              ZTest LEqual

              HLSLPROGRAM

              // 设置关键字
              #pragma shader_feature _ALPHATEST_ON

              #pragma vertex vert
              #pragma fragment frag

              #include "Packages/com.unity.render-pipelines.core/ShaderLibrary/CommonMaterial.hlsl"
              #include "Packages/com.unity.render-pipelines.universal/ShaderLibrary/Core.hlsl"
              #include "Packages/com.unity.render-pipelines.universal/ShaderLibrary/Shadows.hlsl"

              float3 _LightDirection;

              struct Attributes
              {
                  float4 positionOS: POSITION;
                  float3 normalOS: NORMAL;
              };

              struct Varyings
              {
                  float4 positionCS: SV_POSITION;
              };

              // 获取裁剪空间下的阴影坐标
              float4 GetShadowPositionHClips(Attributes input)
              {
                  float3 positionWS = TransformObjectToWorld(input.positionOS.xyz);
                  float3 normalWS = TransformObjectToWorldNormal(input.normalOS);
                  // 获取阴影专用裁剪空间下的坐标
                  float4 positionCS = TransformWorldToHClip(ApplyShadowBias(positionWS, normalWS, _LightDirection));

                  // 判断是否是在DirectX平台翻转过坐标
                  #if UNITY_REVERSED_Z
                      positionCS.z = min(positionCS.z, positionCS.w * UNITY_NEAR_CLIP_VALUE);
                  #else
                      positionCS.z = max(positionCS.z, positionCS.w * UNITY_NEAR_CLIP_VALUE);
                  #endif

                  return positionCS;
              }

              Varyings vert(Attributes input)
              {
                  Varyings output;
                  output.positionCS = GetShadowPositionHClips(input);
                  return output;
              }


              half4 frag(Varyings input): SV_TARGET
              {
                  return 0;
              }

              ENDHLSL

          }
      }
      FallBack "Packages/com.unity.render-pipelines.universal/FallbackError"
  }
思路:
相关keyworld设置
使用
#pragma shader_feature _MAIN_LIGHT_SHADOWS和#pragma multi_compile _ _MAIN_LIGHT_SHADOWS预编译指令控制是否编译主光源阴影相关代码使用
#pragma multi_compile _ _MAIN_LIGHT_SHADOWS_CASCADE控制是否编译级联阴影相关代码使用
#pragma multi_compile _ _ADDITIONAL_LIGHTS_VERTEX _ADDITIONAL_LIGHTS控制是否编译额外光源相关代码使用
#pragma multi_compile _ _SHADOWS_SOFT控制是否编译软阴影相关代码
1
2
3
4
5
 #pragma multi_compile _ _MAIN_LIGHT_SHADOWS
 #pragma multi_compile _ _MAIN_LIGHT_SHADOWS_CASCADE
 #pragma multi_compile _ _ADDITIONAL_LIGHT_SHADOWS
 #pragma multi_compile _ _ADDITIONAL_LIGHTS_VERTEX _ADDITIONAL_LIGHTS
 #pragma multi_compile _ _SHADOWS_SOFT
获得阴影坐标,即
1
2
3
4
5
 // 获取阴影坐标
 float4 shadowCoord = TransformWorldToShadowCoord(i.positionWS.xyz);

 // 使用HLSL的函数获取主光源数据
 Light mainLight = GetMainLight(shadowCoord);
这一步是为了将当前位置的世界坐标转换为阴影坐标,以便与阴影贴图进行比较,从而计算阴影强度
在计算光照时使用
ambient + (diffuse + specular)*light.shadowAttenuation*light.distanceAttenuation计算距离衰减与阴影衰减,其中light为Light结构体实例构造
Tags { "LightMode" = "ShadowCaster" }的投射阴影Pass,可以直接使用URP内置的ShadowCaster Pass:UsePass "Universal Render Pipeline/Lit/ShadowCaster",或者自行编写计算阴影的Pass(见上述代码)。- 注意:在使用URP内置ShadowCaster Pass时, 由于我们定义的CBuffer往往与URP Shadow Caster的CBuffer不一致,因此会无法使用SRP Batcher进行批处理。CBuffer inconsistent size inside a subshader

关于 Toggle组件: Unity Shader ToggleDrawer 布尔开关变量 [Toggle] 设置属性,真机失效_unity中如何在 shader中对布尔属性进行设置值
写入深度图
在自己写的shader中物体的深度不会被自动写入_CameraDepthTexture中,所以需要添加以下Pass来将深度写入_CameraDepthTexture:
1
2
  // UsePass "Universal Render Pipeline/Lit/DepthOnly"
  UsePass "Universal Render Pipeline/Lit/DepthNormals"
具体使用哪一个shader取决于DepthTextureMode:Scripting API: DepthTextureMode (unity3d.com),或者两者都使用
注意:启用SSAO render feature 会使用 _CameraDepthNormalsTexture
参考:
屏幕深度
ref: unity URP前向渲染流程以及获取屏幕空间UV和深度_unity urp 获取指定渲染的对象 十分有用!!!!
[URP Depth 深度](https://www.bilibili.com/read/cv15915308/) 方法
法1 直接使用深度图,在开启Universal Render Pipeline Asset->Rendering->Depth Texture时,可以直接使用_CameraDepthTexture
法2 通过GetVertexPositionInputs(v.vertex.xyz)获取顶点信息,其中包含WS、VS、CS、NDC坐标下的位置,然后直接传递给frag计算即可(记得除以w分量)
屏幕空间纹理
屏幕空间纹理_CameraOpaqueTexture(类似build-in中GrabPass的效果,将屏幕上的内容捕捉到纹理中,然后在后续的Pass中使用)
ref: urp管线的自学hlsl之路 第十五篇 屏幕颜色制作玻璃效果 - 哔哩哔哩 (bilibili.com) Universal Render Pipeline Asset | Universal RP | 14.0.11 (unity3d.com)
方法
与获取深度信息类似,在开启Universal Render Pipeline Asset->Rendering->Opaque Texture时,可以直接使用_CameraOpaqueTexture该纹理
使用前常规定义操作:
1
     TEXTURE2D(_CameraOpaqueTexture); SAMPLER(sampler_CameraOpaqueTexture);
屏幕深度纹理 _CameraDepthTexture
方法
与获取空间纹理相同,在开启Universal Render Pipeline Asset->Rendering->Depth Texture时,可以直接使用_CameraDepthTexture该纹理
使用前常规定义操作:
1
     TEXTURE2D(_CameraDepthTexture); SAMPLER(sampler_CameraDepthTexture);
深度法线 DepthNormal
【Unity UPR】造个获取深度法线纹理的轮子_urp获取buffer中的法线
屏幕法线:
1
      TEXTURE2D(_CameraNormalsTexture); SAMPLER(sampler_CameraNormalsTexture);
获取屏幕空间uv
ref: https://blog.csdn.net/qq_30100043/article/details/125883016
由于uv坐标范围为[0,1],我们所需的屏幕空间uv实则是NDC坐标,因此我们可以通过
GetVertexPositionInputs(v.vertex.xyz)获取positionNDC再除以其w分量即可,注意只需xy分量
屏幕空间边缘光
如果我们把每个点的位置向着法线方向位移一段距离,再根据位移后的坐标采样相机深度图,把深度和自己的深度做对比,如果差值大于一个阈值,那么就是边缘。Unity URP Shader 与 HLSL 自学笔记六 等宽屏幕空间边缘光 - 知乎 (zhihu.com)
广告牌效果
变换在Object Space中进行,具体实现参考unity shader入门精要
注意不同坐标轴中点的变换方法:原坐标各分量乘以变换后坐标对应轴的单位向量即可
注意做叉乘的两个向量不能是同一向量,否则结果为0
注意是否考虑z轴锁定
天空盒
| [URP | 简单天空盒Shader ](https://www.bilibili.com/read/cv15949298/?from=readlist) |
如何修改天空盒:window->rendering->lighting->Environment->Skybox Material
注意,skybox的pass不需要设置LightMode,否则会导致天空盒无法正确显示
视差贴图 Parallax Mapping
要点:要将viewdir转换到切线空间中,因为切线和副切线向量与表面纹理坐标的方向相同(即uv.xy与viewdir.xy相同)
Parallax Mapping原理:

注意:我们在实现视差贴图时,会对原始点进行采样,并将采样高度运用于viewdir的缩放,以获得新的采样点uv,这说明这样的实现存在一定误差
为改善一次采样缩放带来的误差,我们引入steep parallax, 即进行多次采样以提高精度
 我们从上到下遍历深度层,我们把每个深度层和储存在深度贴图中的它的深度值进行对比。如果这个层的深度值小于深度贴图的值,就意味着这一层的P向量部分在表面之下。我们继续这个处理过程直到有一层的深度高于储存在深度贴图中的值:这个点就在(经过位移的)表面下方。
使用LOD
LOD: levels of details
* 模型的LOD:Mesh LOD,即在相机的不同距离下显示不同精度的模型(不涉及shader,只需为当前Game Object添加一个 LOD Group 的Component即可。 LOD 场景优化 网格的细节级别 (LOD)
Shader LOD: 即通过对不同的SubShader指定不同的LOD以实现对统一模型不同精度的渲染,SubShader需按LOD值从大到小排列,因为管线会从maximum LOD开始依此向下查找SubShader,直到找到第一个LOD的SubShader为止。ShaderLab:为子着色器指定 LOD 值 - Unity 手册, 而shader的LOD值可以通过脚本
Shader.maximumLOD或Shader.globalMaximumLOD来控制所需的LOD值。注意:Shader LOD不会跟Mesh LOD一样随着camera的距离自动调整,默认下camera没有maximum LOD,需要手动设置。示例:
1
2
3
4
5
6
7
8
9
10
11
12
13
14
15
16
17
18
19
20
21
22
  using System.Collections;
  using System.Collections.Generic;
  using UnityEngine;
  public class sahderLODCS : MonoBehaviour
  {
      public Material material;
      void Start()
      {
          this.material.shader.maximumLOD = 150;
      }

      // Update is called once per frame
      void Update()
      {
          if(Input.GetKey(KeyCode.A))
          {
              this.material.shader.maximumLOD = 150;
          }else if(Input.GetKey(KeyCode.S)){
              this.material.shader.maximumLOD = 250;
          }
      }
  }
顶点动画
注意顶点动画时,在vertex shader中对贴图进行采样时,需要使用
tex2Dlod函数,不然可能会无法采样重建法线:[重建法线 stackoverflow](https://stackoverflow.org.cn/questions/67041258) 高度图->法线图:高度图->法线图
- _MainTexture_TexelSize,一个容易忘记的属性 {TextureName}_TexelSize - a float4 property contains texture size information:
x contains 1.0/width
y contains 1.0/height
z contains width
w contains height
- 水体效果
贴花
思路:World Space -> Object Space

PBR
- ref: PBR 理论- LearnOpenGL
PBR理论
注:此为重点的摘要,具体内容请阅读参考链接
PBR的基本概念:PBR,或者用更通俗一些的称呼是指基于物理的渲染(Physically Based Rendering),它指的是一些在不同程度上都基于与现实世界的物理原理更相符的基本理论所构成的渲染技术的集合。
其满足以下几个基本原则:
基于微平面(Microfacet)的表面模型。
能量守恒。
应用基于物理的BRDF。
PBR的基本概念
立体角: 常用$\Omega$表示,是一个立体空间中的一个角度,用来描述一个立体空间中的一个方向。
\[d\omega = sin(\theta)d\theta d\phi\]Intensity: 光的强度
\[I=\frac{d\Phi}{d\omega}\]Irradiance: 光的辐照度
\[E=\frac{d\Phi}{dA}\]Radiance: 光的辐射度
\[L=\frac{d^2\Phi}{dAcos\theta d\omega}\]
反射率方程:
\[L_o(p,\omega_o)=\int\limits_\Omega f_r(p,\omega_i,\omega_o)L_i(p,\omega_i)n\cdot\omega_id\omega_i\]其中$L_o$代表出射radiance,其中$p$代表当前p点,$\omega_o$代表出射立体角,$\omega_i$代表入射立体角,$f_r$为BRDF参数,整个式子是在半球面上的积分。
方程满足以下几个基本原则:
基于微平面(Microfacet)的表面模型。
能量守恒。
应用基于物理的BRDF。
BRDF
BRDF,或者双向反射分布函数(Bidirectional Reflective Distribution Function) ,它的作用是基于表面材质属性来对入射辐射率进行缩放或者加权。这里讨论用于实时渲染的Cook-Torrance BRDF
Cook-Torrance BRDF兼有漫反射和镜面反射两个部分:
\[f_r=k_df_{lambert}+k_sf_{cook-torrance}\]这里的$k_d$是入射光线中被折射部分的能量所占的比率,而$k_s$是被反射部分的比率。$k_d+k_s=1$(能量守恒),其中$k_s$相常用下面BRDF中的fersnel项表示(即最后不用乘上ks)
BRDF的左侧表示的是漫反射部分(Lambertian漫反射):
\[f_{lambert}=\frac c\pi\]其中$\pi$用于归一化,$c$为一常数,表示表面颜色
BRDF的右侧表示镜面反射部分:
\[f_{cook-torrance}=\frac{DFG}{4(\omega_o\cdot n)(\omega_i\cdot n)}\]注意要保证分母非零,实现时还要再加一小量
字母D,F与G分别代表着一种类型的函数,各个函数分别用来近似的计算出表面反射特性的一个特定部分。三个函数分别为法线分布函数(Normal Distribution Function),菲涅尔方程(Fresnel Rquation)和几何函数(Geometry Function):
法线分布函数(D):估算在受到表面粗糙度的影响下,朝向方向与半程向量一致的微平面的数量。这是用来估算微平面的主要函数。
Trowbridge-Reitz GGX: \(NDF_{GGXTR}(n,h,\alpha)=\frac{\alpha^2}{\pi((n\cdot h)^2(\alpha^2-1)+1)^2}\) 其中$h$为半程向量,即$normalize(\omega_o+\omega_i)$,$\alpha$为粗糙度参数, $n$为法线向量
几何函数(G):描述了微平面自成阴影的属性。当一个平面相对比较粗糙的时候,平面表面上的微平面有可能挡住其他的微平面从而减少表面所反射的光线。
Smith几何函数(同时考虑入射和出射光线的微表面遮挡):
\[G(n,v,l,k)=G_{sub}(n,v,k)G_{sub}(n,l,k)\]- 其中$G_{sub}$使用Schlick-GGX:
其中$n$为法线向量,$v$为视线向量
$k$为粗糙度参数$\alpha$的重映射值,取决于我们要用的是针对直接光照还是针对IBL光照的几何函数:
\(k_{direct}=\frac{(\alpha+1)^2}8\) \(k_{IBL}=\frac{\alpha^2}2\)
菲涅尔方程(F):菲涅尔方程描述的是在不同的表面角下表面所反射的光线所占的比率。即$k_s$
Fresnel-Schlick近似法求得近似解:
\[F_{Schlick}(h,v,F_0)=F_0+(1-F_0)(1-(h\cdot v))^5\]$F_0$ 表示平面的基础反射率,一般使用金属度来控制:
F0 = lerp(0.04, 1.0, metallic)
PBR的实现注意点
注意,在实现时要确保点乘值是非负的,否则会导致BRDF计算错误,即保证
max(0, dot(xx,yy))$L(p,\omega_i)$是入射光线的radiance,计算中使用
half3 radiance = mainLight.shadowAttenuation*mainLight.color;计算BPR的实现中,不包含环境光遮蔽(AO)的计算,需要自行添加
积分体现在对每一个光源求和
注意在计算G项时要确保分母非零,否则会导致计算错误
计算BRDF项后不需要再乘上ks,因为在计算时已经乘上了(即菲涅尔项)
PBR基础贴图
反照率:反照率(Albedo)纹理为每一个金属的纹素(Texel)(纹理像素)指定表面颜色或者基础反射率。这和我们之前使用过的漫反射纹理相当类似,不同的是所有光照信息都是由一个纹理中提取的。漫反射纹理的图像当中常常包含一些细小的阴影或者深色的裂纹,而反照率纹理中是不会有这些东西的。它应该只包含表面的颜色(或者折射吸收系数)。
法线:法线贴图纹理和我们之前在法线贴图教程中所使用的贴图是完全一样的。法线贴图使我们可以逐片段的指定独特的法线,来为表面制造出起伏不平的假象。
金属度:金属(Metallic)贴图逐个纹素的指定该纹素是不是金属质地的。根据PBR引擎设置的不同,美术师们既可以将金属度编写为灰度值又可以编写为1或0这样的二元值。
粗糙度:粗糙度(Roughness)贴图可以以纹素为单位指定某个表面有多粗糙。采样得来的粗糙度数值会影响一个表面的微平面统计学上的取向度。一个比较粗糙的表面会得到更宽阔更模糊的镜面反射(高光),而一个比较光滑的表面则会得到集中而清晰的镜面反射。某些PBR引擎预设采用的是对某些美术师来说更加直观的光滑度(Smoothness)贴图而非粗糙度贴图,不过这些数值在采样之时就马上用(1.0 – 光滑度)转换成了粗糙度。
AO:环境光遮蔽(Ambient Occlusion)贴图或者说AO贴图为表面和周围潜在的几何图形指定了一个额外的阴影因子。比如如果我们有一个砖块表面,反照率纹理上的砖块裂缝部分应该没有任何阴影信息。然而AO贴图则会把那些光线较难逃逸出来的暗色边缘指定出来。在光照的结尾阶段引入环境遮蔽可以明显的提升你场景的视觉效果。网格/表面的环境遮蔽贴图要么通过手动生成,要么由3D建模软件自动生成。
URP曲面细分 Tessellation
ref:
Unity渲染基础:URP下曲面细分的实现 - 知乎 (zhihu.com)
Unity URP 曲面细分 - 知乎 (zhihu.com)
recommended:Tessellation Stages Microsoft Learn
概述
DX11之后曲面细分可以在GPU上进行,而不是需要在应用阶段由CPU完成再传入GPU,流水线如图:

与Tessellation相关的着色器有:Hull-Shader Stage,Tessellator Stage, Domain-Shader Stage三个部分:

Hull/Tessellator/Domain
注意: 只有Hull 和 Domain 两部分是可编辑的,Tessellator部分由DirectX写死
Hull-Shader Stage:一个可编程着色器阶段,可生成对应于每个输入面片(四边形、三角形或直线)的几何面片和面片常量。A programmable shader stage that produces a geometry patch (and patch constants) that correspond to each input patch (quad, triangle, or line)
Tessellator Stage :一个固定的函数管道阶段,用于创建表示几何补丁的域的采样模式,并生成一组连接这些样本的较小对象(三角形、点或线)。 A fixed function pipeline stage that creates a sampling pattern of the domain that represents the geometry patch and generates a set of smaller objects (triangles, points, or lines) that connect these samples.
Domain-Shader Stage 一个可编程着色器阶段,用于计算对应于每个域样本的顶点位置。A programmable shader stage that calculates the vertex position that corresponds to each domain sample.
Hull-Shader Stage
Hull shader的工作流程:
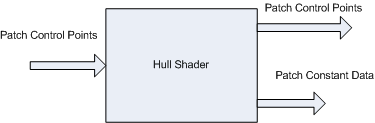
Hull Shader可以细分为两个部分,两部分为并行计算:
The control-point phase :operates once for each control-point, reading the control points for a patch, and generating one output control point (identified by a ControlPointID).
The patch-constant phase:operates once per patch to generate edge tessellation factors and other per-patch constants. Internally, many patch-constant phases may run at the same time. The patch-constant phase has read-only access to all input and output control points.
Hull Shader有如下Properties:
The shader input is between 1 and 32 control points.
The shader output is between 1 and 32 control points, regardless of the number of tessellation factors. The control-points output from a hull shader can be consumed by the domain-shader stage. Patch constant data can be consumed by a domain shader; tessellation factors can be consumed by the domain shader and the tessellation stage.
Tessellation factors determine how much to subdivide each patch.
The shader declares the state required by the tessellator stage. This includes information such as the number of control points, the type of patch face and the type of partitioning to use when tessellating. This information appears as declarations typically at the front of the shader code.
If the hull-shader stage sets any edge tessellation factor to = 0 or NaN, the patch will be culled. As a result, the tessellator stage may or may not run, the domain shader will not run, and no visible output will be produced for that patch.
如何创建:How To Create a Hull Shader
逻辑关系:

具体流程
编译指定:
1
 #pragma hull MyHull
定义结构体(vertex输出/patch constant输出/point输出)
1
2
3
4
5
6
7
8
9
10
 // 常规的vert输出
 struct v2f{
     float4 vertex : POSITION;
     float3 normal : NORMAL;
     float2 uv : TEXCOORD0;
     float4 color : COLOR;
 }

 // patch constant输出,即相关常量的输出
暂未完善~
Domain-Shader Stage
后处理
URP提供的后处理:
Post-processing in the Universal Render Pipeline)
Unity URP中的Post-processing_unity urp postprocessing-CSDN博客
Unity-Technologies/UniversalRenderingExamples
使用方法:
Select a Camera, and select the Post Processing check box.
Add a GameObject with a Volume component in the Scene. This instruction adds a Global Volume. Select GameObject > Volume > Global Volume.
Select the Global Volume GameObject. In the Volume component, create a new Profile by clicking New button on the right side of the Profile property.
Add post-processing effects to the Camera by adding Volume Overrides to the Volume component. 关于Volume:Volumes | Universal RP)
提供的volume override源码位于
\com.unity.render-pipelines.universal@13.1.7\Runtime\Overrides
URP自定义后处理
相关链接
ref:
官方教程:
如何在URP中实现自定义全屏后处理效果 使用Fullscreen Shader Graph/ Full Screen Pass Renderer Feature实现
如何使用Scriptable Renderer Feature与Custom Timeline Track 来自定义后处理效果
后处理组成
注意:URP14与URP12的后处理实现方式有所不同
VolumeComponent: 用于定义后处理效果的参数,以便传入scriptableRendererFeature中
拓展:关于如何用脚本控制volume:Unity中如何用脚本动态控制URP 后处理的volume 参数_unity如何获取volume中-CSDN博客
实现:定义class继承
VolumeComponent类及实现IPostProcessComponent接口1 2 3 4 5 6 7 8 9 10 11 12 13 14 15 16 17 18 19 20 21 22 23 24 25 26 27 28 29 30 31 32 33 34 35 36 37 38 39 40 41 42
using System; // 主要使用的类/接口位于 // E:\Unity_project\GenShin_URP\Library\PackageCache\com.unity.render-pipelines.universal@14.0.9\Runtime\Passes\PostProcessPass.cs // E:\Unity_project\GenShin_URP\Library\PackageCache\com.unity.render-pipelines.core@14.0.9\Runtime\Volume\VolumeComponent.EditorOnly.cs // E:\Unity_project\GenShin_URP\Library\PackageCache\com.unity.render-pipelines.core@14.0.9\Runtime\Volume\VolumeComponent.cs namespace UnityEngine.Rendering.Universal { /// A volume component that holds settings for the Vignette effect. // Serializable标签表示该类可以被序列化, VolumeComponentMenuForRenderPipeline表示该类可以在URP的VolumeComponent菜单中显示 [Serializable, VolumeComponentMenuForRenderPipeline("Post-processing/Vignette", typeof(UniversalRenderPipeline))] [URPHelpURL("post-processing-vignette")] // 该类定义了一个后处理效果,继承自VolumeComponent类,实现了IPostProcessComponent接口 public sealed class Vignette : VolumeComponent, IPostProcessComponent { /// Specifies the color of the vignette. [Tooltip("Vignette color.")] public ColorParameter color = new ColorParameter(Color.black, false, false, true); /// Sets the center point for the vignette. [Tooltip("Sets the vignette center point (screen center is [0.5,0.5]).")] public Vector2Parameter center = new Vector2Parameter(new Vector2(0.5f, 0.5f)); /// Controls the strength of the vignette effect. [Tooltip("Amount of vignetting on screen.")] public ClampedFloatParameter intensity = new ClampedFloatParameter(0f, 0f, 1f); /// Controls the smoothness of the vignette borders. [Tooltip("Smoothness of the vignette borders.")] public ClampedFloatParameter smoothness = new ClampedFloatParameter(0.2f, 0.01f, 1f); /// Controls how round the vignette is, lower values result in a more square vignette. [Tooltip("Should the vignette be perfectly round or be dependent on the current aspect ratio?")] public BoolParameter rounded = new BoolParameter(false); /// <inheritdoc/> public bool IsActive() => intensity.value > 0f; /// <inheritdoc/> public bool IsTileCompatible() => true; } }
ScriptableRendererFeature/ScriptableRenderPass: 用于实现后处理效果的逻辑,其中ScriptableRendererFeature用于控制ScriptableRenderPass的创建/执行顺序/执行条件等行为
官方实现教程/实例:Custom render passes
scriptableRenderPass 实现:需要实现
Configure、Execute、Dispose方法,分别在渲染前配置、渲染时执行、渲染结束释放资源scriptableRendererFeature 实现:需要实现
Create、AddRenderPasses方法,分别在创建时初始化、在渲染时添加renderPasscmd.Blit: 用于将一个RenderTexture的内容复制到另一个RenderTexture中,常用于后处理效果的实现, [URP blit best practices Universal RP 14.0.11 (unity3d.com)](https://docs.unity3d.com/Packages/com.unity.render-pipelines.universal@14.0/manual/customize/blit-overview.html) 官方模板: right click -> Create -> Rendering -> URP Scriptable Renderer Feature
1
2
3
4
5
6
7
8
9
10
11
12
13
14
15
16
17
18
19
20
21
22
23
24
25
26
27
28
29
30
31
32
33
34
35
36
37
38
39
40
41
42
43
44
45
46
47
48
49
  using UnityEngine;
  using UnityEngine.Rendering;
  using UnityEngine.Rendering.Universal;

  public class CustomRenderPassFeature : ScriptableRendererFeature
  {
      class CustomRenderPass : ScriptableRenderPass
      {
          // This method is called before executing the render pass.
          // It can be used to configure render targets and their clear state. Also to create temporary render target textures.
          // When empty this render pass will render to the active camera render target.
          // You should never call CommandBuffer.SetRenderTarget. Instead call <c>ConfigureTarget</c> and <c>ConfigureClear</c>.
          // The render pipeline will ensure target setup and clearing happens in a performant manner.
          public override void OnCameraSetup(CommandBuffer cmd, ref RenderingData renderingData)
          {
          }

          // Here you can implement the rendering logic.
          // Use <c>ScriptableRenderContext</c> to issue drawing commands or execute command buffers
          // https://docs.unity3d.com/ScriptReference/Rendering.ScriptableRenderContext.html
          // You don't have to call ScriptableRenderContext.submit, the render pipeline will call it at specific points in the pipeline.
          public override void Execute(ScriptableRenderContext context, ref RenderingData renderingData)
          {
          }

          // Cleanup any allocated resources that were created during the execution of this render pass.
          public override void OnCameraCleanup(CommandBuffer cmd)
          {
          }
      }

      CustomRenderPass m_ScriptablePass;

      /// <inheritdoc/>
      public override void Create()
      {
          m_ScriptablePass = new CustomRenderPass();

          // Configures where the render pass should be injected.
          m_ScriptablePass.renderPassEvent = RenderPassEvent.AfterRenderingOpaques;
      }

      // Here you can inject one or multiple render passes in the renderer.
      // This method is called when setting up the renderer once per-camera.
      public override void AddRenderPasses(ScriptableRenderer renderer, ref RenderingData renderingData)
      {
          renderer.EnqueuePass(m_ScriptablePass);
      }
  }
shader: 实现效果
用到的函数/类/枚举
ScriptableRendererFeature: 创建RenderPass、初始化RenderPass需要的字段和信息、管理RenderPass插入的时间 API:Class ScriptableRendererFeature | Universal RP | 14.0.11
Create: 初始化ScriptableRendererFeature所需的任何资源,例如Material和ScriptableRenderPass的实例
AddRenderPasses:
使用此方法去添加一个或多个RenderPass到Renderer中(使用renderer.EnqueuePass方法);
默认情况下,这个方法会在所有相机上都调用一次,如果你想要在每个相机上添加不同的RenderPass,你可以在这个方法中检查相机的类型,然后添加不同的RenderPass
注意:URP会在每个相机上都调用一次这个方法,因此不要在这个方法中创建任何资源,因为这样会导致资源的重复创建,应该在Create方法中创建资源;
Dispose: 释放ScriptableRendererFeature所需的任何资源,例如Material和pass的RTHandle。注意:为
protected override void Dispose()SetupRenderPasses: 使用此方法设置任何ScriptableRenderPass所需的资源,例如初始化properties的值,或运行自定义的初始化逻辑。
ScriptableRenderPass: 用于实现渲染逻辑的类, API:Class ScriptableRenderPass
可override的方法:
Execute: 用于执行渲染逻辑
OnCameraCleanup: 用于清理渲染逻辑中的资源
OnCameraSetup: 用于配置渲染资源或清除状态,可以用于创建临时渲染目标纹理;如果为空,则渲染到当前相机的渲染目标
成员函数/属性:
renderPassEvent: 用于指定renderPass的执行时机
- RenderPassEvent: 用于指定renderPass的执行时机的枚举,常用的有
RenderPassEvent.BeforeRendering、RenderPassEvent.AfterRendering等
- RenderPassEvent: 用于指定renderPass的执行时机的枚举,常用的有
ConfigureInput: 用于配置输入的RenderTexture
- ScriptableRenderPassInput: 用于配置输入的RenderTexture的枚举
ConfigureTarget: 用于配置输出的RenderTexture,注意:ConfigureTarget会将渲染目标设置为destination,
ConfigureClear: 用于配置清除RenderTexture的颜色、深度、模板等信息
Configure: 用于配置RenderPass的输入、输出、清除等信息
ScriptableRenderer: 用于执行渲染命令的类,实现了渲染的逻辑:其实现了light culling,设置并描述了一帧中需要执行的
ScriptableRenderPass列表,同时支持ScriptableRendererFeature的添加;其所需的所有资源被序列化在ScriptableRendererData中。API:Class ScriptableRendererrenderer.EnqueuePass: 用于将RenderPass添加到Renderer中
renderer.cameraColorTargetHandle: 用于获取相机的输出纹理贴图的Handle
CoreUtils: SRP的工具类函数库,用于创建RenderTexture等
CoreUtils.CreateEngineMaterial: 用于创建一个材质
CoreUtils.Destroy: 用于销毁一个对象
CoreUtils.SetRenderTarget: 用于设置渲染目标
VolumeManager: 用于管理Volume的类, VolumeManager.instance.stack可以获取当前的VolumeStack,VolumeManager.instance.stack.GetComponent
()可以获取指定类型的VolumeComponent RenderingData: 用于存储渲染数据的类
- renderingData.cameraData.renderer.cameraColorTargetHandle:用于获取相机的输出纹理贴图的Handle
ScriptableRenderContext: 用于执行渲染命令的上下文类
- context.ExecuteCommandBuffer(cmd): 用于执行CommandBuffer中的命令
CommandBufferPool: 用于创建CommandBuffer的类
CommandBufferPool.Get(): 用于获取一个CommandBuffer
CommandBufferPool.Release(): 用于释放一个CommandBuffer
CommandBuffer: 用于存储渲染命令的类
cmd.Blit: 用于将一个RenderTexture的内容复制到另一个RenderTexture中(在URP14中会有问题,换用Blitter)
cmd.SetGlobalTexture: 用于设置全局纹理
cmd.SetGlobalFloat: 用于设置全局浮点数
cmd.GetTemporaryRT: 用于获取一个临时的RenderTexture
cmd.SetRenderTarget: 用于设置渲染目标
Blitter:提供多种Blit(texture copy)方法的类
Blitter.BlitCameraTexture: 用于将(相机)的纹理复制到另一个纹理中,建议使用
Blitter.BlitTexture: 用于将一个纹理复制到另一个纹理中,不建议使用
坑:BlitCameraTexture 方法本身不会覆盖 ConfigureTarget 设置的渲染目标。ConfigureTarget 是在设置渲染通道的渲染目标,而 BlitCameraTexture 是在执行渲染操作,将一个纹理的内容复制到另一个纹理。然而,BlitCameraTexture 方法中的 CoreUtils.SetRenderTarget(cmd, destination); 会设置当前的渲染目标为 destination。这意味着在调用 BlitCameraTexture 方法后,后续的渲染操作将会向 destination 写入数据,而不是 ConfigureTarget 设置的渲染目标。如果你希望在调用 BlitCameraTexture 方法后继续使用 ConfigureTarget 设置的渲染目标,你需要再次调用 CommandBuffer.SetRenderTarget 方法来恢复渲染目标
坑:对于RTHandle的初始化,需使用RenderingUtils.RellocateIfNeed()方法(或者使用RTHandle.Alloc()方法),例如:
1
2
 mid_des = new RenderTextureDescriptor(Screen.width,Screen.height,RenderTextureFormat.Default);  //创建一个默认格式的RenderTextureDescriptor,如需更改格式,可设置RenderTextureFormat.Depth等
 RenderingUtils.ReAllocateIfNeeded(ref midhandle, mid_des);
注意:Scene 窗口显示的是
renderingData.cameraData.renderer.cameraColorTargetHandle这张图像
RTHandle: 用于操纵RenderTexture的类
- RTHandle.Release(): 用于释放RTHandle
RenderTextureDescriptor: 用于存储RenderTexture描述的类,一般与RTHandle一起使用
RenderingUtils: RenderTexture的相关帮助函数
- RenderingUtils.RellocateIfNeed(): 当传入的RTHanlde与Descriptor不匹配时,重新分配一个RenderTexture
ShadowUtils: 用于处理阴影的类
- ShadowRTReAllocateIfNeeded: 用于重新分配阴影贴图
Screen: 用于获取屏幕宽高等信息的类
Screen.width: 屏幕宽度
Screen.height: 屏幕高度
Shader: 用于定义shader的类
- Shader.PropertyToID():用于获取shader中属性的ID,返回一个int值
注意: 要及时释放CommandBuffer/RTHandle,否则会导致内存泄漏
关于后处理的Shader实践
内置Blit库:
"Packages/com.unity.render-pipelines.core/Runtime/Utilities/Blit.hlsl"Blit: 用于将一个RenderTexture的内容复制到另一个RenderTexture中
Blit.hlsl 实现了一系列着色器和函数,一般使用其中的
Vert作为顶点着色器,而片元着色器自行编写Blit.hlsl中内置纹理:
1
2
  _BlitTexture
  _BlitCubeTexture
内置Sampler:
1
2
  sampler_LinearClamp
  sampler_LinearRepeat
HLSL内置的纹理可用:
可能需要设置
ScriptablePass.ConfigureInput(ScriptableRenderPassInput.Normal|ScriptableRenderPassInput.Depth)等才能使用_CameraDepthTexture: 屏幕深度纹理_CameraOpaqueTexture: 屏幕颜色纹理_CameraNormalsTexture: 屏幕法线纹理
未查证
_CameraColorTexture_MainTex
后处理效果
模糊
高斯模糊
卷积核:
\[\frac{1}{256}\cdot\begin{bmatrix}1&4&6&4&1\\4&16&24&16&4\\6&24&36&24&6\\4&16&24&16&4\\1&4&6&4&1\end{bmatrix}\]高斯模糊可以进行多次迭代,即多次乘以卷积核,以达到更好的卷积效果,(实现需要设置多个pass,每个pass进行一次卷积)
为减少计算量,可以使用分离高斯模糊,即先进行水平方向的模糊,再进行垂直方向的模糊,这样可以将卷积核的大小从$5\times5$减小到$1\times5$和$5\times1$(本质上就是深度可分离卷积),实现也需要设置多个pass
光圈模糊
实现:对原图像进行多次旋转Golden Angle度采样,注意每次旋转时需增加半径,同时增加的半径递减,权重递减
Golden Angle: 为一个黄金角度,即$137.5^\circ$(弧度制为$2.39996322972865332$),用于保证采样均匀,Golden angle - Wikipedia
实现参考:
1
2
3
4
5
6
7
8
9
10
11
12
13
14
15
16
17
18
19
      half4 BokehBlur(VaryingsDefault i)
      {
          half2x2 rot = half2x2(_GoldenRot);
          half4 accumulator = 0.0;
          half4 divisor = 0.0;

          half r = 1.0;
          half2 angle = half2(0.0, _Radius);

          for (int j = 0; j < _Iteration; j++)
          {
              r += 1.0 / r; //增加半径递减
              angle = mul(rot, angle);
              half4 bokeh = SAMPLE_TEXTURE2D(_MainTex, sampler_MainTex, float2(i.texcoord + _PixelSize * (r - 1.0) * angle));
              accumulator += bokeh * bokeh;
              divisor += bokeh; //权重递减
          }
          return accumulator / divisor;
      }
Bloom
实现:使用两个pass,第一个pass提取高亮部分,第二个pass对高亮部分进行模糊处理(可采用高斯模糊),最后将模糊后的高亮部分与原图像相加
人眼对于亮度的感知是非线性的,近似表示:
half brightness = 0.2125*color.r+0.7154*color.g+0.0721*color.b;
平面空间描边
- 实现:当屏幕深度或法线变化剧烈时,即为边缘,可以通过对深度或法线进行Sobel算子计算,然后对结果进行阈值处理,最后将结果与原图像相加
体积光/体积云
- 重建世界坐标:Reconstruct the world space positions of pixels from the depth texture | Universal RP | 14.0.11 (unity3d.com) j
核心实现:
1
2
3
4
5
6
7
8
9
10
11
12
13
14
15
half4 normal = SAMPLE_TEXTURE2D(_CameraNormalsTexture,sampler_CameraNormalsTexture,i.texcoord.xy);
float2 UV = i.positionCS.xy / _ScaledScreenParams.xy; //为什么可行,见讨论

// Sample the depth from the Camera depth texture.注意,官方实现得到的depth会出现y轴偏移的bug
// #if UNITY_REVERSED_Z
    // real depth = SampleSceneDepth(UV);
// #else
    // // Adjust Z to match NDC for OpenGL ([-1, 1])
    // real depth = lerp(UNITY_NEAR_CLIP_VALUE, 1, SampleSceneDepth(UV));
// #endif
// 直接采样不会出现y轴偏移的bug
float depth = SAMPLE_TEXTURE2D_X(_CameraDepthTexture,sampler_CameraDepthTexture,i.texcoord);

// Reconstruct the world space positions.
float3 worldPos = ComputeWorldSpacePosition(UV, depth, UNITY_MATRIX_I_VP);
实现逻辑:
体积光:通过RayMarching算法,对场景中的体积进行采样,然后对采样结果进行积分,最后将积分结果与原图像相加/混合,即从摄像机位置向屏幕每个像素发射光线,对每一步长度进行采样,然后对采样结果进行积分
god light:基本与体积光相同,但需要同时对阴影贴图进行采样,然后根据阴影贴图的采样结果对光线进行衰减
Unity纹理
注意点/坑
HLSL/CG采样方法:
1
2
3
4
5
6
7
     // CG中的采样方法(HLSL中也可使用)
     sampler2D _MainTex;
     float4 color = tex2D(_MainTex, i.uv);
     // HLSL中的采样方法
     TEXTURE2D(_MainTex); SAMPLER(sampler_MainTex); //定义纹理和采样器
                                                    //等价于 texture2D _mainTex; samplerState _mainTex_sampler;
     float4 color = SAMPLE_TEXTURE2D(_MainTex, sampler_MainTex, i.uv);
在循环中采样要十分注意,可能会出现由于调用mipmap导致的错误,可以通过指定具体的循环次数上限/或换用
tex2Dlod方法解决。注意在使用确定循环次数上限时注意把循环次数放在前面,例如for(int i=0;i<10&&i<max;i++),否则可能会出现错误
Custom Render Texture
Unity - Manual: Custom Render Textures (unity3d.com)
Custom Render Texture 是一种特殊的纹理,它允许您在运行时使用脚本来控制纹理的内容。Custom Render Texture 可以用于实现各种效果,例如实时反射、实时阴影、实时变形等。可以用于生成2D纹理、3D纹理、立方体纹理、数组纹理、体积纹理等。
使用Script控制custom render texture:
- 使用
CustomRenderTexture类进行控制
使用Shader创建custom render texture:
注意:使用的是CG/HLSL语言
为自定义渲染纹理编写着色器时,必须执行以下操作:
#include "UnityCustomRenderTexture.cginc"使用提供的顶点着色器
CustomRenderTextureVertexShader为frag着色器使用提供的输入结构
v2f_customrendertexture
v2f_customrendertexture结构:```c struct v2f_customrendertexture { float4 vertex : SV_POSITION; float3 localTexcoord : TEXCOORD0; // Texcoord local to the update zone (== globalTexcoord if no partial update zone is specified),相对于当前正在处理的更新区域的纹理坐标。 float3 globalTexcoord : TEXCOORD1; // Texcoord relative to the complete custom texture,相对于自定义渲染纹理本身的纹理坐标 uint primitiveID : TEXCOORD2; // Index of the update zone (correspond to the index in the updateZones of the Custom Texture),当前正在处理的更新区域的索引。 float3 direction : TEXCOORD3; // For cube textures, direction of the pixel being rendered in the cubemap, 对于立方体自定义渲染纹理,立方体贴图内当前像素的方向。 };
v2f_init_customrendertexture结构:texcoord float3 相对于自定义渲染纹理本身的纹理坐标UnityCustomRenderTexture.cginc中定义了一些常用的函数和变量:名称 类型 说明 CustomRenderTextureWidth float 自定义纹理的宽度(以像素为单位) CustomRenderTextureHeight float 自定义纹理的高度(以像素为单位) CustomRenderTextureDepth float 自定义纹理的深度(以像素为单位,仅适用于 3D 纹理,否则将始终等于 1)。 CustomRenderTextureCubeFace float Unity 处理的当前立方体贴图面的索引(-X、+X、-Y、+Y、-Z、+Z)。这仅适用于立方体贴图。 CustomRenderTexture3DSlice float 正在处理的当前 3D 切片的索引。这仅适用于 3D 纹理。 SelfTexture2D Sampler2D 仅适用于双缓冲纹理:该纹理包含上次交换之前的上次更新的结果。 SelfTextureCube SamplerCUBE 仅适用于双缓冲纹理:该纹理包含上次交换之前的上次更新的结果。 SelfTexture3D Sampler3D 仅适用于双缓冲纹理:该纹理包含上次交换之前的上次更新的结果。 模板:右键->Create->Shader->Custom Render Texture Shader
1
2
3
4
5
6
7
8
9
10
11
12
13
14
15
16
17
18
19
20
21
22
23
24
25
26
27
28
29
30
31
32
  Shader "CustomRenderTexture/Simple"
  {
      Properties
      {
          _Color ("Color", Color) = (1,1,1,1)
          _Tex("InputTex", 2D) = "white" {}
      }

      SubShader
      {
          Lighting Off
          Blend One Zero

          Pass
          {
              CGPROGRAM
              #include "UnityCustomRenderTexture.cginc"
              #pragma vertex CustomRenderTextureVertexShader
              #pragma fragment frag
              #pragma target 3.0

              float4      _Color;
              sampler2D   _Tex;

              float4 frag(v2f_customrendertexture IN) : COLOR
              {
                  return _Color * tex2D(_Tex, IN.localTexcoord.xy);
              }
              ENDCG
              }
      }
  }
2D纹理
方法1:使用Custom Render Texture创建2D纹理
方法2:使用RenderTexture类创建2D纹理Texture2D - Unity 脚本 API (unity3d.com)
3D纹理
3D 纹理 - Unity 手册 (unity3d.com)
方法1:使用Custom Render Texture创建3D纹理
方法2:使用Texture3D类创建3D纹理Texture3D - Unity 脚本 API (unity3d.com)
- 实现框架:
1
2
3
4
5
6
7
8
9
10
11
12
13
14
15
16
17
18
19
20
21
22
23
24
25
26
27
28
29
30
31
32
33
34
35
36
37
38
39
40
41
42
43
44
45
46
  using UnityEditor;
  using UnityEngine;

  public class ExampleEditorScript : MonoBehaviour
  {
      [MenuItem("CreateExamples/3DTexture")]
      static void CreateTexture3D()
      {
          // 配置纹理
          int size = 32;
          TextureFormat format = TextureFormat.RGBA32;
          TextureWrapMode wrapMode =  TextureWrapMode.Clamp;

          // 创建纹理并应用配置
          Texture3D texture = new Texture3D(size, size, size, format, false);
          texture.wrapMode = wrapMode;

          // 创建 3 维数组(实则1维)以存储颜色数据
          Color[] colors = new Color[size * size * size];

          // 填充数组,使纹理的 x、y 和 z 值映射为红色、蓝色和绿色
          float inverseResolution = 1.0f / (size - 1.0f);
          for (int z = 0; z < size; z++)
          {
              int zOffset = z * size * size;
              for (int y = 0; y < size; y++)
              {
                  int yOffset = y * size;
                  for (int x = 0; x < size; x++)
                  {
                      colors[x + yOffset + zOffset] = new Color(x * inverseResolution,
                          y * inverseResolution, z * inverseResolution, 1.0f);
                  }
              }
          }

          // 将颜色值复制到纹理
          texture.SetPixels(colors);

          // 将更改应用到纹理,然后将更新的纹理上传到 GPU
          texture.Apply();

          // 将纹理保存到 Unity 项目
          AssetDatabase.CreateAsset(texture, "Assets/Example3DTexture.asset");
      }
  }
- 实现框架: